School ma ganyri karva mate na agtyna sutro

.GIF)
| इन्टरप्रिटर इन्टरपेटर भी कम्पाइलर की भांति कार्य करता है । अन्तर यह है कि कम्पाइलर पूरे प्रोग्राम को एक साथ मशीनी भाषा में बदल देता है और इन्टरपेटर प्रोग्राम की एक-एक लाइन को मशीनी भाषा में परिवर्तित करता है । प्रोग्राम लिखने से पहले ही इन्टरपेटर को स्मृति में लोड कर दिया जाता है ।
कम्पाइलर और इन्टरप्रिटर में अन्तर
इन्टरपेटर उच्च स्तरीय भाषा में लिखे गए प्रोग्राम की प्रत्येक लाइन के कम्प्यूटर में प्रविष्ट होते ही उसे मशीनी भाषा में परिवर्तित कर लेता है, जबकि कम्पाइलर पूरे प्रोग्राम के प्रविष्ट होने के पश्चात उसे मशीनी भाषा में परिवर्तित करता है । |


| स्टैटिक रैम (SRAM) स्टैटिक रैम में संचित किए गए आंकड़े स्थित रहते हैं । इस RAM में बीच के दो आंकड़े मिटा दिए जाएं तो इस खाली स्थान पर आगे वाले आंकड़े खिसक कर नहीं आएंगे । फलस्वरूप यह स्थान तब तक प्रयोग नहीं किया जा सकता जब तक कि पूरी मेमोरी को “वाश” करके नए सिरे से काम शुरू न किया जाए । |
प्रोग्रामेबिल रॉम (PROM)
इस स्मृति में किसी प्रोग्राम को केवल एक बार संचित किया जा सकता है, परंतु न तो उसे मिटाया जा सकता है और न ही उसे संशोधित किया जा सकता है । | |
इरेजेबिल प्रॉम (EPROM)
इस I.C. में संचित किया गया प्रोग्राम पराबैंगनी किरणों के माध्यम से मिटाया ही जा सकता है । फलस्वरुप यह I.C. दोबारा प्रयोग की जा सकती है ।इलेक्ट्रिकली-इ-प्रॉम (EEPROM) इलेक्ट्रिकली इरेजेबिल प्रॉम पर स्टोर किये गये प्रोग्राम को मिटाने अथवा संशोधित करने के लिए किसी अन्य उपकरण की आवश्यकता नहीं होती । कमाण्ड्स दिये जाने पर कम्प्यूटर में उपलब्ध इलैक्ट्रिक सिगल्स ही इस प्रोग्राम को संशोधित कर देते हैं । | |


chalu nokri drmayan avasan pamnar karmchari na aashrit ne
rhemrahe nimnuk ange ni
yojna na atyar sudhi na tmam
paripatro
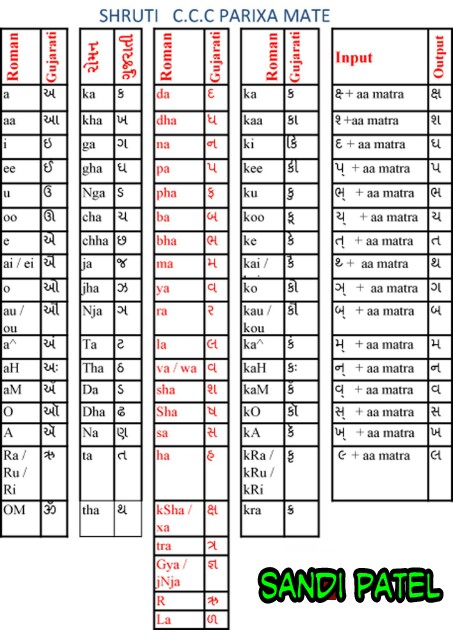
CCC MA VAPRATA SHURTI GUJRATI SOFTWERE DOWNLOAD
(1) Gujarati IME
(2) TBIL Convertor
=> Your pc ma intelling softwere and useing this soft
=> TBIL convertor ma koi pan file ne convert kae va mate . Koi pan language ma convart kar .
Useing Enjoy... . . . .
Online G.P.F ACCOUNT details info link
Step :
(1) department name
(2) G.P.F account number
(3) your mobile number
(4) go
And using for account details
www.agap.cag.gov.in/SlipsGpf.aspx

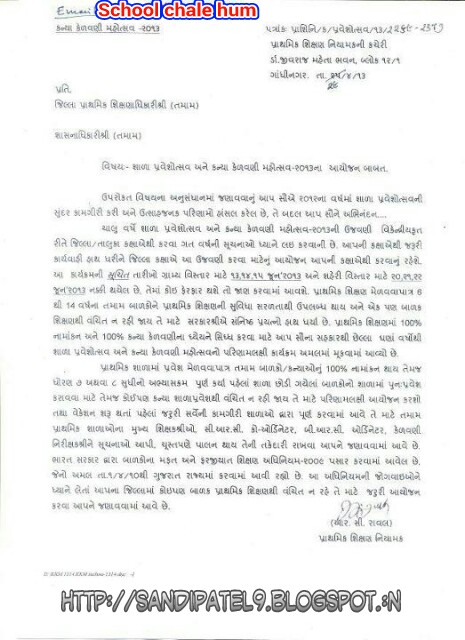
sarva shiksha abhiyan
Gujarat shala pravesotsav ane
kanya Kelvani Rathyatra2013-2014

Short Forms & Full Forms
Computer = Commonly Operated Machine Particularly Used in Technical and Educational Research
CPU = Central Processing Unit
RAM = Random Access Memory
ROM = Read Only Memory
PROM = Programmable Read Only Memory
EPROM = Erasable PROM
EEPROM = Electrically EPROM
HDD = Hard Disk Drive
FDD = Floppy Disk Drive
KBD = KeyBoard
I/O = Input & Output
CD = Compact Disk
DVD = Digital Video Disk
SMPS = Switch Mode Power Supply
POST = Power ON Self Test
BIOS = Basic Input Output System
VDU = Visible Display Unit
LED = Light Embedded Diode
LCD = Liquid Crystal Display
USB = Universal Serial Bus
VGA = Video/Visual Graphic Adapter
LAN = Local Area Network
WAN = Wide Area Network
MAN = Metropolitan Area Network
HLL = High Level Language
LLL = Low Level Language
MIPS = Million of Instruction Per Second
Mbps = Mega Bytes Per second
Kbps = Kilo Bytes per second
HTTP = Hyper Text Templates
WWW = World Wide Web
IP = Internet Protocol
ISP = Internet Service Provider
4 Bits = 1 Nibble
8 Bits = 1 Byte
1024 Bytes = 1 Kilo Byte ( KB )
1024 KB = 1 Mega Byte ( MB )
1024 MB = 1 Gyga Byte ( GB )
1024 GB = 1 Tera Byte ( TB )
1024 TB = 1 Peta Byte ( PB )
1024 PB = 1 Exa Byte ( EB )
1024 EB = 1 Zetta Byte ( ZB )
1024 ZB = 1 Yotta Byte ( YB )

KNOW MORE
COMPUTER ABBREVIATIONS
AGP : Accellerated Graphics Port
ARPANET: Advanced Research Projects
AgencyNetwork
BIOS : Basic Input- Output System.
CAD : Computer Aided Design.
CD : Compact Disc.
CDAC : Centre for Development of Advanced
Parallel Computing.
CDMA : Code Division Multiple Access.
C-DOT : Center for Development of
Telematrics.
GAIS : Gateway Internet Access Service
HTTP : Hyper Text Transfer Protocol
ROM : Read Only Memory
RAM : Random Access Memory
MODEM : Modulation : Demodulation.
PSTN : Public Switched Public Data Network.
PSPDN : Pocket Switched Public.
RABAN : Remote Area Business Message
Network.
LAN : Local Area Network
WAN : Wide Area Network .
MAN : Metropolitan Area Network.
E-Mail : Electronic Mail.
LDU : Liquid Display Unit.
CPU : Central Processing Unit.
CAM : Computer Aided Manufacturing.
CATScan : Computerized Axial Tomography
Scan .
COBOL : Common Business Oriented
Language.
COMAL : Common Algorithmic Language.
DOS : Disk Operating System.
DTS : Desk Top System
DTP : Desk Top Publishing.
E-Commerce : Electronic Commerce.
ENIAC : Electronic Numerical Integrator And
Calculator
FAX : Far Away Xerox.
FLOPS : Floating Operations Per Second.
FORTRAN : Formula Translation.
HLL : High Level Language.
HTML : Hyper Text Markup Language.
IBM : International Business Machine.
IC : Integrated Circuit
ISH : International Super Highway.
LISP : List Processing.
LLL : Low Level Language
MICR : Magnetic Ink Character Recognizer.
MIPS : Millions of Instructions Per Second.
MOPS : Millions of Operations Per Second.
MPU : Micro Processor Unit.
NICNET : National Information Center
Network.
OMR : Optical Mark Reader.
PC-DOT : Personal Computer Disk Operation
System.
PROM : Programmable Read Only Memory.
SNOBOL : String Oriented Symbolic
Language.
UPS : Uninterpretable Power Supply.
VDU : Visual Display Unit.
VLSI : Very Large Scale Integrated.
WWW : World Wide Web.
WLAN : Wireless Local Area Network.
Wi-fi : Wireless Fidelity
TIFF : Tagged Image File Format
e-SATA : External Serial Advanced
Technology Attachment
WiMAX : Worldwide Interoperabilit y for
Microwave Access
JPEG : Joint Photographic Experts Group
GIF : Graphics Interchange Format
ATX : Advanced Technology Extended
UATX : Ultra Advanced TechnologyExten ded
FATX : Flex Advanced Technology Extended
MATX : Micro Advanced Technology Extended
EEATX : Enhanced Extended Advanced
Technology Extended
DDR SDRAM : Double-Data-Rat e
Synchronous Dynamic Random Access
Memory
DDR RAM : Double-Data-Rat e Random
Access Memory
GUI : Graphical User Interfaces
CUI : Command User Interfaces
NAT : Network Address Translation
BIOS:Basic Input/Output System
SCSI: Small Computer Systems Interface
OCR:Optical Character Recognition
PCI:Pperipheral Component Interface
PDA:Personal Digital Assistant
MIDI:Musical Instrument Digital Interface
BPS:Bites Per Second
KBPS:KiloBits Per Second
MPEG:Motion Picture Experts Group
JPEG:Joint Photographic Expert Group
LCD:Liquid Crystal Display
MAC:Media Access Control


.GIF)
/e-pustak/e-pus/Images/processing.bmp)
पर्सनल कम्प्यूटर
पर्सनल कम्प्यूटर माइक्रो कम्प्यूटर समानार्थक से जाने वाले वैसे कम्प्यूटर प्रणाली है जो विशेष रूप से व्यक्तिगत अथवा छोटे समूह के द्वारा प्रयोग मे लाए जाते हैं। इन कम्प्यूटरों को बनाने में माइक्रोप्रोसेसर मुख्य रूप से सहायक होते है । पर्सनल कम्प्यूटर निर्माण विशेष क्षेत्र तथा कार्य को ध्यान में रखकर किया जाता है। उदाहरणार्थ- घरेलू कम्प्यूटर तथा कार्यालय में प्रयोगकिये जाने वाले कम्प्यूटर। बजारमें, छोटे स्तर की कम्पनियों अपने कार्यालयों के कार्य के लिए पर्सनल कम्प्यूटर को प्राथमिकता देते हैं।
पर्सनल कम्प्यूटर के मुख्य कार्यो में क्रीड़ा-खेलना, इन्टरनेट का प्रयोग , शब्द-प्रक्रिया इत्यादि शामिल हैं। पर्सनल कम्प्यूटर के कुछ व्यवसायिक कार्य निम्नलिखित हैं- | ||
1. कम्प्यूटर सहायक रूपरेखा तथा निर्माण
2. इन्वेन्ट्री तथा प्रोडक्शन कन्ट्रोल
3. स्प्रेडशीट कार्य
4. अकाउन्टिंग
5. सॉफ्टवेयर निर्माण
6. वेबसाइट डिजाइनिंग तथा निर्माण
7. सांख्यिकी गणना
| ||
पर्सनल कम्प्यूटर का मुख्य भाग
माइक्रोप्रोसेसर वह चीप होती जीस पर कंट्रोल यूनिट और ए. एल. यू. एक परिपथ होता है। माइक्रोप्रोसेसर चिप तथा अन्य डिवाइस एक इकाई में लगे रहते है, जिसे सिस्टम यूनिट कहते है। पी,सी. में एक सिस्टम यूनिट, एक मनिटर या स्क्रीन एक की बोर्ड एक माउस और अन्य आवश्यक डिवाइसेज, जैसे प्रिंटर, मॉडेम, स्पीकर, स्कैनर, प्लॉटर , ग्राफिक टेबलेट , लाइच पेन आदि होते हैं।
पर्सनल कम्प्यूटर का मूल सिद्धान्त
पी.सी एक प्रणाली है जिसमें डाटा और निर्देशों को इनपुट डिवाइस के माध्यम से स्वीकार किया जाता है। इस इनपुट किये गये डाटा व निर्देशों को आगे सिस्टम यूनिट में पहुँचाया जाता है, जहाँ निर्देशों के अनुसार सी. पी. यू. डाटा पर क्रिया या प्रोसेसिंग का कार्य करता है और परिचय को आउटपुट यूनिट मॉनीटर या स्क्रीन पर भेज देता है। यह प्राप्त परिणाम आउटपुट कहलाता है। पी. सी में इनपुट यूनिट में प्रायः की-बोर्ड और माउस काम आते है जबकि आउटपुट यूनिट के रूप में मॉनिटर और प्रिटर काम आते हैं। | ||
1. अनुप्रयोग के आधार पर कम्प्यूटरों के प्रकार
.यद्यपि कम्प्यूटर के अनेक अनुप्रयोग हैं जिनमे से तीन अनुप्रयोगों के आधार पर कम्प्यूटरों के तीन प्रकार होते हैं : (a) एनालॉग कम्प्यूटर (b ) डिजिटल कम्प्यूटर (c) हाईब्रिड कम्प्यूटर
| |||


Samsung Mobile : Secret Codes List
*#9125# : Smiley
*#9999# : Software Version *#06# : IMEI Number
*#0001# : Serial Number *#9998*523# : LCD Contrast *#0228# or *#8999*228# : Battery Info
*#8999*636# : Display Storage Capacity
*#8999*778# : Display SIM Card Information
*#8999*782# : Show Date And Alarm Clock
*#8999*786# : The Display During Warning
*#8999*837# : Samsung Hardware Version
*#0523# - *#8999*523# : Display Contrast
*#8999*638# : Show Network Information
*#9998*246# : Battery Status- Memory Capacity
*#9998*324# - *#8999*324# : Debug Screen
*#9998*842# - *#8999*842# : Vibration Test
*#9998*289# - *#8999*289# : Alarm Beeper -Ringtone Test
*#8999*9266# : Display Received Channel Number And Received Intensity
*#8999*364# : Watchdog ON/OFF *#8999*427# : WATCHDOG Signal Route Setup
*2767*3855# : Full Reset (Caution every stored data will be deleted.) *2767*2878# : Custom Reset *2767*927# : Wap Reset *2767*226372# : Camera Reset (deletes photos)
*2767*688# : Reset Mobile TV #7263867# : RAM Dump (On or Off)
#*4773# : Incremental Redundancy
#*7785# : Reset wake-up & RTK Timer Variables
#*7200# : Tone Generator Mute
#*3888# : BLUETOOTH Test Mode #*7828# : Task Screen
#*2562# : Restarts Phone #*2565# : No Blocking? General Defense.
#*3353# : General Defense, Code Erased.
#*3837# : Phone Hangs on White screen.
#*3849# : Restarts Phone #*7337# : Restarts Phone (Resets Wap Settings)
#*2886# : Auto Answer ON/OFF #*7288# : GPRS Detached/Attached
#*7287# : GPRS Attached #*2077# : GPRS Switch
#*22671# : AMR REC START #*22673# : Pause REC
#*22674# : Resume REC #*22675# : AMR Playback #*22676# : AMR Stop Play #*22677# : Pause Play
#*22678# : Resume Play #*77261# : PCM Rec Req #*77262# : Stop PCM Rec #*77263# : PCM Playback #*77264# : PCM Stop Play #*22679# : AMR Get Time #*7666# : White Screen
#*7693# : Sleep Deactivate/Activate
#*2286# : Data Battery
#*2679# : Copycat Feature Active/Deactivate
#*3940# : External Loop-Test 9600 bps
#*4263# : Hands Free Mode Activate/Deactivate
#*2558# : Time ON
#*3941# : External Loop-Test 115200 bps
#*5176# : L1 Sleep
#*7462# : SIM Phase
#*7983# : Voltage/Freq
#*7986# : Voltage
#*8466# : Old Time
#*2255# : Call Failed
#*5376# : Delete All Sms!!!! #*2337# : Permanent Registration Beep
#*2474# : Charging Duration #*2834# : Audio Path (Hands-free)
#*3270# : DCS Support Activate/Deactivate
#*3282# : Data Activate/Deactivate
#*3476# : EGSM Activate/Deactivate
#*3676# : Format Flash Volume!!! #*4760# : GSM Activate/Deactivate
#*4864# : White Screen
#*7326# : Accessory
#*7683# : Sleep Variable
#*3797# : Blinks 3D030300 In RED
#*7372# : Resetting The Time To DPB Variables
*#8999*667# : Debug Mode *#92782# : Phone Model (Wap) #*5737425# : JAVA Mode *#2255# : Call List
*#232337# : Bluetooth MAC Address
*#5282837# : Java Version *#8999*8376263# : All Versions Together
*#8999*8378# : Test Menu *#4777*8665# : GPSR Tool *#8999*523# : LCD Brightness *#8999*377# : Error LOG Menu *#8999*327# : EEP Menu
*7465625*228# : Active Lock ON #7465625*228# : Active Lock OFF *7465625*28638# : Auto Network Lock ON
#7465625*28638# : Auto Network Lock OFF
*7465625*28782# : Auto Subset Lock ON
#7465625*28782# : Auto Subset Lock OFF
*7465625*2877# : Auto SP Lock ON
#7465625*2877# : Auto SP Lock OFF
*7465625*2827# : Auto CP Lock ON
#7465625*2827# : Auto CP Lock OFF
*7465625*28746# : Auto SIM Lock ON
#7465625*28746# : Auto SIM Lock OFF
*#7465625# : Check the phone lock status
*7465625*638*Code# : Enables Network lock #7465625*638*Code# : Disables Network lock *7465625*782*Code# : Enables Subset lock #7465625*782*Code# : Disables Subset lock
*7465625*77*Code# : Enables SP lock
#7465625*77*Code# : Disables SP lock
*7465625*27*Code# : Enables CP lock
#7465625*27*Code# : Disables CP lock
*7465625*746*Code# : Enables SIM lock
#7465625*746*Code# : Disables SIM lock
In this article we would prepare pen
drive as a window XP installation
media. Once we prepared this pen
drive you could install XP from this.
This is useful for notebook or
CDROM / DVDROM less system.
Requirement
Windows Xp installation disk,
solution.rar file
Working pen drive of at least 2
GB.
We need to transfer all XP installation media files into pen drive. If you don't
have dump of XP CD on hard disk
then you need to copy them from XP CD.
Download this file solution.rar and
extract it.
Attach a pen drive (All data will be
erase from pen drive)
Open the folder where you have
extracted the files from solution.rar and run HpUSBformat.exe.
This command will detect your USB disk, if not, select form the list ( in this example my USB memory stick is drive M: )
Now set these options
Volume label : - SYSTEM
Check marks on :- Create a
DOS Start up disk
Select radio button :- Using
DOS system files located at:
Give the path where you have
extracted solution.rar (Give the
path of DOS folder) files
At this moment pen drive has become DOS bootable.
Copy all other files from DOS folder to your USB disk. ( you can overwrite existing ones)
Insert Windows Xp installation disk into CD-ROM and copy all files from CD to USB drive.
Now pen drive should look like this
Now you have a xp bootable pen
drive.
Now we have XP bootable pen drive.
We would install XP from this pen
drive.
Boot system from this pen drive. If
system does not boot from pen drive check first bootable media setting in BIOS.
Step1:- When system is booted up, and you see command prompt, type sys d: and hit enter if you see system
transferred - you have luck, FAT32 file system is on drive C:, you will not lose your data
- go to step 5
- if any problem appears go to
Step2:- REMEMBER, you will loose all data from drive C:/> - when system is booted up from USB, your drive C:
appears as D:
Step3:- Type format d:/q/s to format drive D:
accept and when it is finished, go to
step 5 ( you are lucky, you don't need to make partitions)
otherwise go to step 4
Step4:- Type fdisk and hit enter
create new partition ( after restart
boot with pendrive in)
go to step 3 and format the partitions and come back here :)
type pqmagic and set your new
partition active
( physical drive 2, Advanced A, set
Active - S, are you sure - Y, Exit - X )
Step5:- Type nc and hit enter, and
using Norton Commander, copy all files form pendrive to disk C: ( you can overwrite existing ones
Step6:- Restart Laptop without pen drive in it (it should start from hard drive)
Step7:- Type cd i386 and hit enter (it will enter i386 folder)
Step8:- Type winnt and hit enter
Step9:- this will launch xp installation process and you can install xp as youdo with cd.

In this article we would create a
window XP bootable CD from copied
files. This is very useful when you
have copied files of XP. To keep
backup we generally copy the entire
disk on hard disk. But you could not
create a bootable disk from these
files.
To make a bootable XP disk
from copied files we need to add boot files with image on CD.
The following items are required:
A copy of the original Windows
CD/DVD.
A copy of the Boot Files
Download from here.
A minimum of 1GB available
hard disk space for CD's.
A minimum of 5GB available
hard disk space for DVD's.
Extract the zip file
This zip file contain all required boot files
Create a folder named xpcd on c:\
drive and copy all the files and folder of windows XP cd in it
Now start your CD burning software I have used NERO for it
Select new options from files menu then choose CDROM(BOOT)
In right pane do following settings
Select boot tab
Select Image file from Source of
boot image data
Click on Browse and choose
boot.ima ( where you have
extract image files)
Check Enable expert settings
(for advanced users only!).
Set Kind of emulation: to No
Emulation.
Set Load segment of sectors
(hex!): to 0000.
Set Number of loaded sectors:
to 4.
Click on the ISO tab.
Set File name length to Max. of
31 chars (ISO Level 2).
Set Format to Mode 1.
Set Character Set to ISO 9660
(standard ISO CD-ROM).
Check the Joliet check box.
Check all Relax ISO
Restrictions.
Check Allow more than 64
characters for Joliet names.
Click on the Label tab.
IN ISO 9660 text field Enter
volume lable
IN Joliet text boxes. Enter
system identifier label
Click the Burn tab.
Check Write.
Check Finalize CD (No further
writing possible!).
Set Write Method to Disc-at-
once. (We have had Track-At-
Once work as well.)
Click the New button
Locate the folder C:\xpcd ( OR where you have copied xp cd)
Select everything from the folder and
drag it to the ISO compilation panel.
and Click the burn CD Dialog button
Verify the settings. Correct if needed.
Click the Burn button.
This will launch CD burning wizard
Click the OK button
Congratulations you have successfully
created windows xp bootable cd.
Now you can use this window XP
bootable cd for installation.

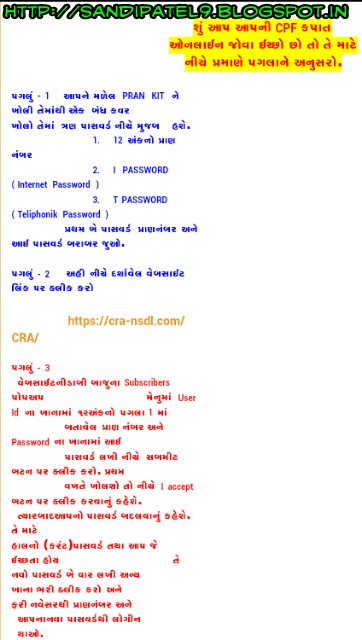
All karmachari je C.P.F account dharavta darek ne online jova mate niche na steps anusaro

Computer Info, Tips and Tricks about the
Operating System.. ( Windows XP )
Since defragging the disk won't do much to
improve Windows XP performance, here are
23 suggestions that will. Each can enhance
the performance and reliability of your
customers' PCs. Best of all, most of them
will cost you nothing.
1.) To decrease a system's boot time and
increase system performance, use the
money you save by not buying
defragmentation software -- the built-in
Windows defragmenter works just fine --
and instead equip the computer with an
Ultra-133 or Serial ATA hard drive with 8-
MB cache buffer.
2.) If a PC has less than 512 MB of RAM,
add more memory . This is a relatively
inexpensive and easy upgrade that can
dramatically improve system performance.
3.) Ensure that Windows XP is utilizing the
NTFS file system. If you're not sure, here's
how to check: First, double-click the My
Computer icon, right-click on the C: Drive,
then select Properties. Next, .. examine the
File System type; if it says FAT32, then
back-up any important data. Next, click
Start, click Run, type CMD, and then click
OK. At the prompt, type CONVERT C: /
FS:NTFS and press the Enter key. This
process may take a while; it's important that
the computer be uninterrupted and virus-
free. The file system used by the bootable
drive will be either FAT32 or NTFS. I highly
recommend NTFS for its superior security,
reliability, and efficiency with larger disk
drives.
4.) Disable file indexing. The indexing
service extracts information from documents
and other files on the hard drive and creates
a "searchable keyword index." As you can
imagine, this process can be quite taxing on
any system.
The idea is that the user can search for a
word, phrase, or property inside a document,
should they have hundreds or thousands of
documents and not know the file name of
the document they want. Windows XP's
built-in search functionality can still perform
these kinds of searches without the Indexing
service. It just takes longer. The OS has to
open each file at the time of the request to
help find what the user is looking for.
Most people never need this feature of
search. Those who do are typically in a
large corporate environment where
thousands of documents are located on at
least one server. But if you're a typical
system builder, most of your clients are
small and medium businesses. And if your
clients have no need for this search feature,
I recommend disabling it.
Here's how: First, double-click the My
Computer icon. Next, right-click on the C:
Drive, then select Properties. Uncheck "Allow
Indexing Service to index this disk for fast
file searching." Next, apply changes to "C:
subfolders and files," and click OK. If a
warning or error message appears (such as
"Access is denied"), click the Ignore All
button.
5.) Update the PC's video and motherboard
chipset drivers. Also, update and configure
the BIOS. For more information on how to
configure your BIOS properly, see this article
on my site.
6.) Empty the Windows Prefetch folder
every three months or so. Windows XP can
"prefetch" portions of data and applications
that are used frequently. This makes
processes appear to load faster when called
upon by the user. That's fine. But over time,
the prefetch folder may become overloaded
with references to files and applications no
longer in use. When that happens, Windows
XP is wasting time, and slowing system
performance, by pre-loading them. Nothing
critical is in this folder, and the entire
contents are safe to delete.
7.) Once a month, run a disk cleanup.
Here's how: Double-click the My Computer
icon. Then right-click on the C: drive and
select Properties. Click the Disk Cleanup
button -- it's just to the right of the Capacity
pie graph -- and delete all temporary files.
8.) In your Device Manager , double-click on
the IDE ATA/ATAPI Controllers device, and
ensure that DMA is enabled for each drive
you have connected to the Primary and
Secondary controller. Do this by double-
clicking on Primary IDE Channel. Then click
the Advanced Settings tab. Ensure the
Transfer Mode is set to "DMA if available"
for both Device 0 and Device 1. Then repeat
this process with the Secondary IDE
Channel.
9.) Upgrade the cabling. As hard-drive
technology improves, the cabling
requirements to achieve these performance
boosts have become more stringent. Be sure
to use 80-wire Ultra-133 cables on all of
your IDE devices with the connectors
properly assigned to the matching Master/
Slave/Motherboard sockets. A single device
must be at the end of the cable; connecting
a single drive to the middle connector on a
ribbon cable will cause signaling problems.
With Ultra DMA hard drives, these signaling
problems will prevent the drive from
performing at its maximum potential. Also,
because these cables inherently support
"cable select," the location of each drive on
the cable is important. For these reasons,
the cable is designed so drive positioning is
explicitly clear.
10.) Remove all spyware from the
computer. Use free programs such as
AdAware by Lavasoft or SpyBot Search &
Destroy. Once these programs are installed,
be sure to check for and download any
updates before starting your search.
Anything either program finds can be safely
removed. Any free software that requires
spyware to run will no longer function once
the spyware portion has been removed; if
your customer really wants the program
even though it contains spyware, simply
reinstall it. For more information on
removing Spyware visit this Web Pro News
page.
11.) Remove any unnecessary programs
and/or items from Windows Startup routine
using the MSCONFIG utility. Here's how:
First, click Start, click Run, type MSCONFIG,
and click OK. Click the StartUp tab, then
uncheck any items you don't want to start
when Windows starts. Unsure what some
items are? Visit the WinTasks Process
Library. It contains known system processes,
applications, as well as spyware references
and explanations. Or quickly identify them
by searching for the filenames using Google
or another Web search engine.
12.) Remove any unnecessary or unused
programs, from the Add/Remove Programs
section of the Control Panel.
13.) Turn off any and all unnecessary
animations, and disable active desktop. In
fact, for optimal performance, turn off all
animations. Windows XP offers many
different settings in this area. Here's how to
do it: First click on the System icon in the
Control Panel. Next, click on the Advanced
tab. Select the Settings button located under
Performance. Feel free to play around with
the options offered here, as nothing you can
change will alter the reliability of the
computer -- only its responsiveness.
14.) If your customer is an advanced user
who is comfortable editing their registry, try
some of the performance registry tweaks
offered at Tweak XP.
15.) Visit Microsoft's Windows update site
regularly, and download all updates labeled
Critical. Download any optional updates at
your discretion.
16.) Update the customer's anti-virus
software on a weekly, even daily, basis.
Make sure they have only one anti-virus
software package installed. Mixing anti-virus
software is a sure way to spell disaster for
performance and reliability.
17.) Make sure the customer has fewer
than 500 type fonts installed on their
computer. The more fonts they have, the
slower the system will become. While
Windows XP handles fonts much more
efficiently than did the previous versions of
Windows, too many fonts -- that is, anything
over 500 -- will noticeably tax the system.
18.) Do not partition the hard drive.
Windows XP's NTFS file system runs more
efficiently on one large partition. The data is
no safer on a separate partition, and a
reformat is never necessary to reinstall an
operating system. The same excuses people
offer for using partitions apply to using a
folder instead. For example, instead of
putting all your data on the D: drive, put it in
a folder called "D drive." You'll achieve the
same organizational benefits that a separate
partition offers, but without the degradation
in system performance. Also, your free
space won't be limited by the size of the
partition; instead, it will be limited by the
size of the entire hard drive. This means you
won't need to resize any partitions, ever.
That task can be time-consuming and also
can result in lost data.
19.) Check the system's RAM to ensure it
is operating properly. I recommend using a
free program called MemTest86. The
download will make a bootable CD or
diskette (your choice), which will run 10
extensive tests on the PC's memory
automatically after you boot to the disk you
created. Allow all tests to run until at least
three passes of the 10 tests are completed.
If the program encounters any errors, turn
off and unplug the computer, remove a stick
of memory (assuming you have more than
one), and run the test again. Remember, bad
memory cannot be repaired, but only
replaced.
20.) If the PC has a CD or DVD recorder,
check the drive manufacturer's Web site for
updated firmware. In some cases you'll be
able to upgrade the recorder to a faster
speed. Best of all, it's free.
21.) Disable unnecessary services. Windows
XP loads a lot of services that your
customer most likely does not need. To
determine which services you can disable
for your client, visit the Black Viper site for
Windows XP configurations.
22.) If you're sick of a single Windows
Explorer window crashing and then taking
the rest of your OS down with it, then follow
this tip: open My Computer, click on Tools,
then Folder Options. Now click on the View
tab. Scroll down to "Launch folder windows
in a separate process," and enable this
option. You'll have to reboot your machine
for this option to take effect.
23.) At least once a year, open the
computer's cases and blow out all the dust
and debris. While you're in there, check that
all the fans are turning properly. Also
inspect the motherboard capacitors for
bulging or leaks. For offers about discounts:
www.discountsvu.com
Following any of these suggestions should
result in noticeable improvements to the
performance and reliability of your
customers' computers. If you still want to
defrag a disk, remember that the main
benefit will be to make your data more
retrievable in the event of a crashed drive.
Athor:- sandi patel


